We’re assuming you have read our previous Azure DevOps blogs. If not, then you may want to go back and start at the beginning before reading on.
If you’re all caught up, by now you have picked a process template, decided whether to use area paths, and set up your sprints and schedule. Now it’s time to set up your team to work with you using Azure DevOps.
Set Up Your Team
Each product could have one or more team working on its development. We prefer to keep it simple whenever possible and just have one team focus on one product, but we also recognize that this is not always feasible. You can set up multiple teams within one project; but if team members are shared between both teams, then it can start to get a bit messy.
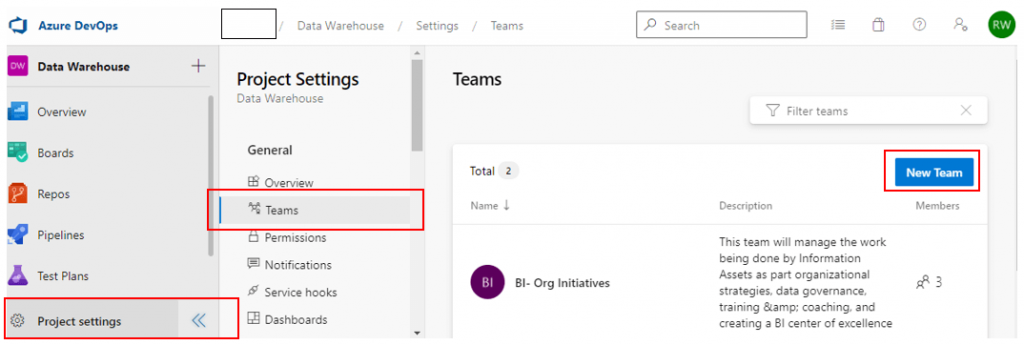
To set up your team, navigate to your settings icon (gear wheel) and click on Teams under the General heading. Click on the New Team button to define your team.
Enter your team’s name, choose all your team members from your Entra ID list, and then select administrators. Team administrators can also create alerts so that the team can receive notifications if or when changes are made to their work items.
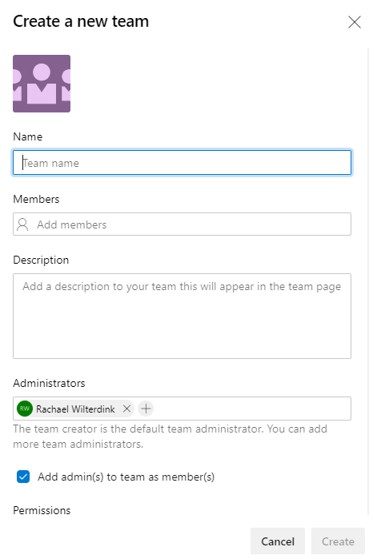
Tip: It’s a good idea to have more than one admin, in case one is not available.
Select permissions for the team and hit Create. It’s simple. If you need to adjust permissions at a group or user level, you can configure that in the Permissions area under General.
Once your team has been created, confirm that your team members can all access the team project.
Adding External Team Members
If you have any team members that are external to your organization, there are likely some extra steps that will need to be taken to allow them access to the workflows in Azure DevOps. Any external team members must have an email account that is associated with a Microsoft account to gain access to Azure DevOps. This is extremely annoying to deal with, but it can be done. You may need to work with your IT department to ensure that any external participants are able to access the system.
Now that your team is selected, and access is confirmed for all team members, it’s time to get your team’s capacity.
Managing Team Capacity
What is capacity? It is the amount of time a team member has available to work on the product in each sprint. Although we want our teams to remain agile, it’s important to capture each team member’s anticipated capacity so you can properly assign work items in Sprint Planning.
Managing capacity in Azure DevOps lets you plan your work for upcoming sprints or iterations. Team members who are performing tasks associated with development toward the sprint goal should be allocated and have available capacity. Prior to, or at the beginning of, Sprint Planning, you should collect everyone’s capacity and enter it into Azure DevOps (or to speed things up, have each team member pre-load their capacity before planning).
Add Your Team Members
Unfortunately, your team members don’t always magically appear in the capacity list for each sprint, so you must manually add them. Like setting up sprints, we tend to do this at the beginning of the project and add all the team members to all the sprints. You can always remove people if they are no longer needed.

What is “Full-Time”?
There is some debate about what a full-time team member’s capacity is. Let’s be realistic about it. No one truly works a full eight hours in a workday. This time is cut up and interrupted by meetings, hallway conversations (pre-COVID – now they are chats on Microsoft Teams, Slack, or Zoom), IM communications, context switching, email, bathroom breaks, lunch, etc.
In an ideal world, people would be able to fully devote eight hours of focused work each day, but that’s not how life works. To account for this, we usually set a full-time development team member’s capacity at six and a half to seven hours a day instead of eight. This accounts for the activities that inevitably reduce our efficiency and production.
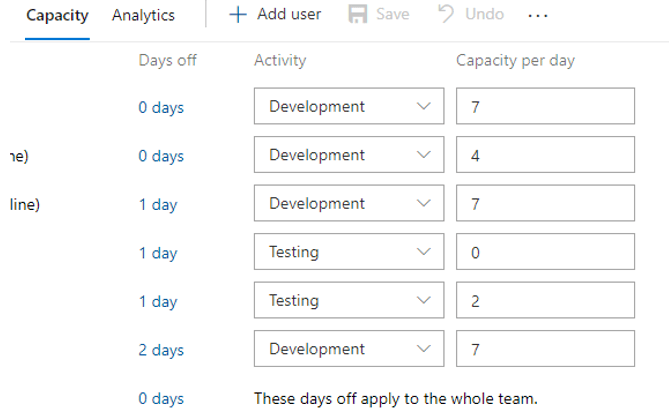
If team members have other responsibilities on top of their assignment to this project, we also reduce capacity as appropriate to ensure their capacity remains realistic. While management may question this decision, it’s easy to back it up with the facts.
Shared Days Off
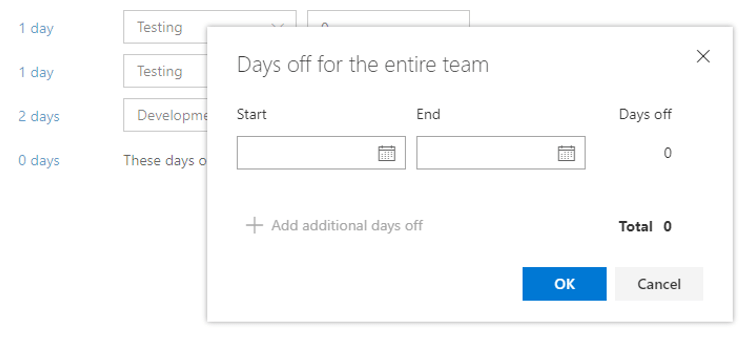
Azure DevOps lets you enter days off for the entire team. This is most useful for holidays and can be done in advance. We also use this feature to account for our team’s review / retro / planning day (which we combined into one day to improve our efficiency in getting through our Scrum events with minimal context switching or downtime). On larger projects, this can take an entire day, and this tool is useful for ensuring that I’m not including this day as available development capacity.
Individual Days Off
Team members can also take individual days off. They can indicate this at the beginning of planning or can pre-enter any planned time off. Teams also need to be flexible to allow for unexpected issues such as loss of childcare or spontaneous time off. Ideally, this would be accounted for during planning. But, if not, then the team will need to adjust accordingly based on a loss of capacity for the sprint.
One drawback of Azure DevOps is that time off is only accounted for in whole days. If an individual has a half day off, or a few hours, this cannot be tracked using Azure DevOps. We don’t find this to be an issue since we don’t think Azure DevOps should be used to track time, but it can make planning a bit less precise.
Activities
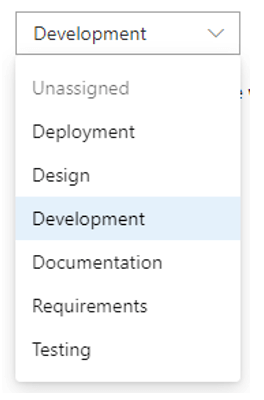
Azure DevOps also has a feature to track activity by available development team member. This may (or may not) be helpful to you, depending on the nature of your work. We do find this useful on most projects, but the list is predefined. Although it may be configurable, I’ve never investigated it.
Most of our projects are related to some sort of IT system development, so the available activity choices generally work for me. The only issue with this is that sometimes resources perform more than one type of activity, but they can only be assigned to one.
Don’t Forget to Save!
One thing that really annoys me about capacity planning is that if you leave the page without saving, then you must start all over again. The system doesn’t automatically save your capacity changes. So, make sure you remember to hit the “Save” button before leaving the capacity screen.

Showing Available Capacity
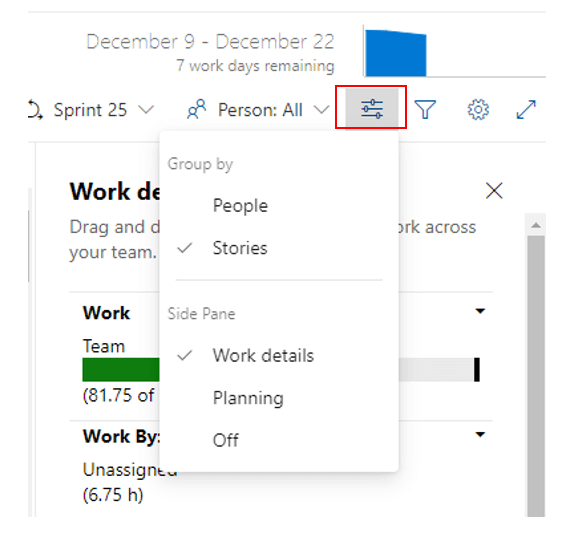
After you have entered your team’s capacity and start Sprint Planning, you can turn on the useful Work details toggle which shows each allocated team member with work time scheduled and time available. This is helpful to maximize teamwork and ensure that work is evenly distributed amongst the team members. This also helps you avoid over-allocating a person’s available work time.
That’s about all there is to entering capacity! In our next installment in this series, we’ll be covering Views.


Share on